America's Test Kitchen: Blueberry Scones

[Scroll down to view recipe and video]

I absolutely had to look to see if America's Test Kitchen had a recipe for blueberry scones due to my visit to England this past summer. I started thinking of British scones when I was recently in London partaking in afternoon tea at a local hotel because nothing is more British than afternoon tea in the UK other than pronouncing schedule as shedule, referring to an elevator as a lift, and driving on the other side of the street. A big part of afternoon tea is not only the tea itself but the various pastries that are served with your tea. These snacks include finger sandwiches, sweet buns, small cakes, and even scones.

America's Test Kitchen Blueberry Scone
America's Test Kitchen: Blueberry Scones
Lucky for us, we don’t need a formal afternoon tea to enjoy a sugary, buttery, crumbly, flakey scone. Scones can be eaten with your breakfast. Also, if you’re not much of a tea drinker, eat your scone with a cup of Joe. In addition to tea, scones go great with your coffee either in the morning during breakfast, an afternoon sweet treat as a snack, or even dessert. After all, here in the United States we are a coffee drinking nation.

Unfortunately, a lot of the scones I have tried here have the consistency of bricks. They are just so dense that they can probably double up as either a door jam or a paper weight. In America’s Test Kitchen (Season 8, Episode 7 Coffeehouse Treats), they go over how to make a really light, fluffy blueberry scone. You can at least use the same dough to make cream scones or you can replace the blueberries with another type of berry (raspberry, strawberry, blackberry, huckleberry etc.) if you so desire, but blueberries are the way to go. Frozen blueberries can be used in place of fresh blueberries, but if you’re going to go through the trouble of making homemade blueberry scones, be sure to spare no expense and use the fresh variety.

Work quickly when handling the dough for blueberry scones.

Making these blueberry scones kind of reminds me of the time I made blueberry muffins because of the simplicity of the recipe and the ease in making them (and the blueberries of course). Also, just like in the blueberry muffins, I left out the sugar topping because I felt like both the muffin and scone didn't need it. Adding the sugar topping to me was overkill and unnecessary, but definitely don't leave out the sour cream which provides a certain level of richness to the scones. Also, the key to making these scones nice and flaky is in folding the dough on itself (see the images above) like you would do for puff pastry. See my post on apple turnovers to learn more about flaky puff pastry. Drawing my experience from making blueberry muffins and apple turnovers, I felt like I've already made these scones before. Ultimately, nothing beats these homemade scones, so go ahead and try these out. The video demonstration is below. Feel free to use this scone dough as a base for other flavored scones like a lemon scone or perhaps a savory scone like a cheese scone. It'd also be great if we can make a gluten free version of these scones.

FlavorFool's Notes

  • I didn't bother adding the sugar topping.
  • Work quickly and keep the dough cold. A cold dough is easier to work with than a dough that is at room temperature.
  • Blueberry Scones Recipe

    America's Test Kitchen - season 8 episode 7, Coffeehouse Treats
    Makes 8 scones

    Ingredients

    1 ½ cups fresh blueberries (about 7 1/2 oz)
    10 tbsp (2 sticks) unsalted butter, frozen whole
    ½ cup sour cream
    ½ cup whole milk
    ½ cup sugar (3 1/2 oz), plus 1 tbsp for sprinkling
    2 cups unbleached all-purpose flour (10 oz), plus additional for work surface
    ¼ tsp baking soda
    2 tsp baking powder
    1 tsp grated lemon zest
    ½ tsp table salt

    Instructions

    1. Adjust oven rack to middle position and heat oven to 425 degrees. Grate 8 tbsp of butter on large holes of box grater. Place grated butter in freezer until needed. Melt 2 tbsp of remaining ungrated butter and set aside. Place blueberries in freezer until needed.

    2. Whisk together sour cream and milk in medium bowl; refrigerate until needed. Whisk flour, baking powder, 1/2 cup sugar salt, baking soda, and lemon zest in medium bowl. Add frozen butter to flour mixture and toss with fingers until thoroughly coated.

    3. Add milk mixture to flour mixture; fold with spatula until just combined. With rubber spatula, transfer dough to liberally floured work surface. Dust surface of dough with flour; with floured hands, knead dough 6 to 8 times, until it just holds together in ragged ball, adding flour as needed to prevent sticking.

    4. Roll dough into approximate 12-inch square. Fold dough into thirds like a business letter, using bench scraper or metalspatula to release dough if it sticks to countertop. Lift short ends of dough and fold into thirds again to form approximate 4-inch square. Transfer dough to plate lightly dusted with flour and chill in freezer 5 minutes.

    5. Transfer dough to floured work surface and roll into approximate 12-inch square again. Sprinkle blueberries evenly over surface of dough, then press down so they are slightly embedded in dough. Using bench scraper or thin metal spatula, loosen dough from work surface. Roll dough, pressing to form tight log. Lay seam-side down and press log into 12 by 4-inch rectangle. Using sharp, floured knife, cut rectangle crosswise into 4 equal rectangles. Cut each rectangle diagonally to form 2 triangles and transfer to parchment-lined baking sheet.

    6. Brush tops with melted butter and sprinkle with remaining tablespoon sugar [I didn’t add the sugar topping]. Bake until tops and bottoms are golden brown, 18 to 25 min. Transfer to wire rack and let cool 10 min before serving.

    To Make Ahead: After placing the scones on the baking sheet, either refrigerate them overnight or freeze. When ready to bake, for refrigerated scones, heat oven to 425 degrees and follow directions in step 6. For frozen scones, heat oven to 375 degrees, follow directions in step 6, and extend cooking time to 25 to 30 minutes

    Video: Bridget Lancaster from America's Test Kitchen shows Chris Kimball how to make blueberry scones

    General Mills Announces the Return of Monster Cereals

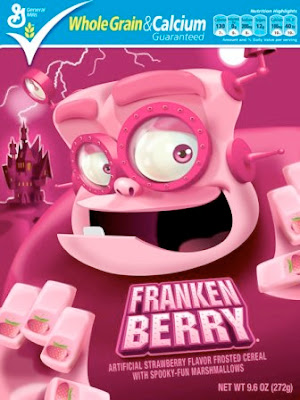
    One of my favorite cereals growing up as a child in the suburbs was Count Chocula. Then, there was also Frankenberry cereal which was a strawberry flavored cereal and the Frankenstein counterpart to Count Chocula's Dracula. I was always partial towards Count Chocula because simply what kid doesn't like a sugary cereal with bits of marshmallow and Dracula in each bowl? The best part, though, was the chocolate flavored milk left in your cereal bowl (which I happily slurped straight from the bowl instead of using the spoon) once all the vampire shaped cereal bits were all gone. Lucky for me, I can

    General Mills announces the return of Monster Cereals for Halloween
    The Monsters of General Mills' Monster Cereals

    still get my monster cereal fix because cereal maker General Mills just announced that the entire Monster cereal line will be made available for this coming Halloween. As mentioned previously, there's Count Chocula and Frankenberry, but there are 3 other monster cereals that were produced and will also be made available. There's Boo Berry which was a blueberry flavored cereal in the theme of a ghost, Fruit Brute which was a fruity cereal in the theme of a Werewolf, and lastly Fruity Yummy Mummy which was a fruity cereal in the theme of a Mummy. Fruit Brute and Fruity Yummy Mummy were discontinued a long time ago which makes their rise from the dead during Halloween all the more special.


    Count Chocula Cereal
    Chocolate + Vampires = Count Chocula Cereal

    Frankenberry Cereal
    Strawberries + Frankenstein = Frankenberry Cereal

    Looking back, the monster cereals were such a marketing success geared specifically for sugar-hungry kids whose favorite meal of the day was cereal. I remember seeing the commercial as a kid and wanting my mom to buy me a box of Count Chocula. I must say though that in my age, I might actually go for the Boo Berry once I see the monsters hitting the shelves since I do love blueberries (see my post on blueberry muffins). Even though I still love chocolate, my interest in vampires has plummeted with those Twilight movies showing up all over the place and utterly ruining it for me...sorry Count Chocula. I'm actually quite excited with the return of the monster cereals - there's definitely a feeling of nostalgia with the thought of the monsters making a reunion in my local grocery store. My view on vampires will never be the same after Count Chocula was born, so keep an eye out for them monsters during Halloween and be sure to buy a box and relive your youth for at least one breakfast. I know I'll be stocking up on all five flavors. Which monster cereal was your favorite growing up?

    Boo Berry Cereal
    Blueberries + Ghosts = Boo Berry Cereal

    Fruit Brute Cereal
    Fruity Flavors + Werewolf = Fruit Brute Cereal


    Fruity Yummy Mummy Cereal
    Fruity Flavors + Mummy = Fruity Yummy Mummy Cereal

    Katie Couric's Lemon Bars for Mother's Day

    [skip to see: recipe]

    Last year my mom found a recipe for lemon bars in her People magazine (May 14, 2012 issue of People). The recipe was supplied by none other than news anchor Katie Couric formerly of the Today Show and CBS Evening news.

    Katie Couric would often make this dessert recipe for Mother's Day as a family tradition and my mom wanted me to make these lemon bars for her for Mother's Day as well. My first reaction was, "Since when was Katie Couric a chef?" You see, mom loves her celebrity gossip and is enamored by celebrities in general which explains why she subscribes to People magazine and watches Extra and Access Hollywood, so when she saw that there was a lemon bar recipe endorsed by Katie Couric, then now she just had to have me make these for her as a dessert.

    Katie Couric's Recipe for Lemon Bars from People magazine
    Katie Couric's lemon bars from People magazine
    Because it was Mother's Day, I obliged and made these lemon bars. I was pleasantly surprised that these lemon bars were easy to make and were quite good. I'm not even a lemon bar kind of a guy, but I found myself eating multiple squares because it was pretty good. The reason why it has taken me over a year to write this lemon bar post is because I plan to make these again for a pot luck at my work. I had totally forgotten about this recipe until now. I guess Katie Couric really does know what she's talking about on when she's on tv. Katie Couric, if you're reading this, I will never doubt you again.

    Katie Couric's recipe for lemon bars
    Lemon Bars fresh out of the oven!

    Katie Couric's lemon bar squares
    Cut the lemon bars into squares

    FlavorFool's Notes

  • Don't be worried if your lemon bars seem rather gooey in the middle. I originally mistook this for it still being raw egg, but rest assured that that's the way it's supposed to be. When it cools, it'll begin to set, but don't be surprised if the lemon/egg mixture is soft right out of the oven.
  • When sprinkling the confectioners' sugar on top of the lemon bars, I would use a small strainer which would help evenly distribute the sugar on top. Use of a strainer makes the sugar topping prettier when plating.
  • You can always lessen the number of tablespoons of lemon juice if you don't want your lemon bars to be too lemony. If 6 tablespoons is way too much for your palate to handle, then use 4 tablespoons instead. I once used only 2 tablespoons and there was a subtle lemon flavor, but not enough of it since I mostly tasted the crust. I felt like the lemon flavor was lost and was not featured enough using this small amount of lemon juice.
  • Katie Couric's Lemon Bars Recipe

    People Magazine, May 14, 2014
    Makes 24 lemon squares

    Ingredients

    2 cups sugar
    ½ cup confectioners' [or powdered] sugar
    4 eggs
    2 cups plus another 6 tablespoons of flour, divided
    1 cup room temperature butter, sliced into 8 pieces
    6 tablespoons lemon juice [adjust this accordingly to control the level of lemonyness you want your bars to have]
    lemon zest
    pinch of salt

    Instructions

    1. Preheat oven to 350 degrees and lightly grease a 13x9 inch baking pan.

    2. In a food processor, blend confectioners' sugar, 2 cups flour and salt. Add butter and pulse until mixture is crumbly. Press into pan and bake for 20 mins.

    3. Meanwhile, beat eggs, 2 cups sugar, 6 tablespoons flour, and lemon juice until well combined. Stir in lemon zest. Pour on top of hot crust and bake for an additional 25 mins.

    4. Let it cool and sprinkle with confectioners' sugar. Cut into squares.

    America's Test Kitchen Ultimate Banana Bread

    [Scroll down to view recipe and video]

    America's Test Kitchen's recipe for their Ultimate Banana Bread solves the problem with a lot of the banana breads I've tasted in that

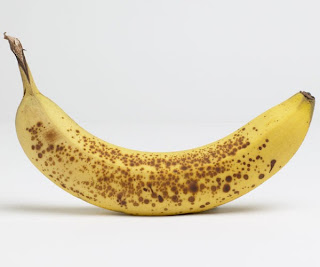
    the main ingredient (banana) is barely noticeable when you bite into it. That's kind of like eating a peach cobbler and not tasting the peaches! For banana bread, the bananas have to be the hero! They explain that the trick for banana bread is to use ripened bananas. When I was a kid, I've always liked the taste of a bruised and freckled banana (Exhibit A) instead of a bright yellow one (Exhibit B). These are the bananas that are perfect for banana bread because the banana flavor really comes through when they are ripe.

    Loaf of Banana Bread
    loaf of banana bread fresh out of the oven
    You would think that the concept of using ripe bananas is obvious, but no it isn't. Why you ask? Because some people don't like seeing freckles and bruises on their bananas. These flavor-challenged folks see these blemishes and think that the fruit is rotten, but that certainly isn't the case with bananas like it is with other fruits. They just don't like the concept of eating a banana that isn't pristine and perfectly yellow even though the patches of black is an indication that the banana itself is ripe. When a banana is ripe, the starches turn into sugars making for a better tasting banana and, hence, a better tasting banana bread.

    Ripe Banana with Black Spots
    Exhibit A: ripe banana with spots and bruises - more flavor
    Perfectly Yellow Unripened Banana
    Exhibit B: bright yellow and unripened banana - not as much flavor
    In the following episode (season 11, episode 8: Coffee Break Sweets), ATK Chef Julia Collin Davison shows us how to use ripe bananas so that our banana bread can taste like banana. It goes to show that making the ultimate banana bread that actually tastes like banana doesn't have to be difficult at all. I've had some banana breads that were overly dense, but this banana bread is nice and light and not to mention moist and delicious. You can, of course, change it around a bit. I went to one picnic where someone brought a homemade loaf of banana bread and she added melted chocolate to the batter so that when you slice yourself a piece, the slice looked marbled. It was pretty cool to see a marbled banana bread, and the chocolate didn't make it overly sweet either...more like a subtle chocolate flavor in each slice that complemented the banana flavor. Now if there were only a gluten free banana bread, I'll be all over that.

    FlavorFool's Notes

  • Even though it's optional, definitely use the chopped walnuts. It gives a bit more texture since the crunch from the walnuts contrasts from the light chewy interior. Adding the chopped walnuts changes this Ultimate Banana Bread into the Ultimate Banana Nut Bread. I just did not toast them just to save myself from doing an extra step. Untoasted walnuts is good enough for me.
  • I excluded the fresh banana slices and sugar topping. Let's just keep it simple and not get too fancy here. Save yourself some time and energy by skipping the topping. The banana bread is perfectly fine without it.
  • slice of freshly baked banana bread
    Slice of Freshly Baked Banana Bread

    Ultimate Banana Bread Recipe

    America's Test Kitchen - season 11, episode 8, Coffee Break Sweets
    Makes one 9 in loaf

    Ingredients

    6 large very ripe bananas (about 2¼ pounds), peeled (see note)
    1¾ cups (8¾ ounces) unbleached all-purpose flour
    2 tsp granulated sugar
    ¾ cup (5¼ ounces) packed light brown sugar
    1 tsp baking soda
    ½ tsp table salt
    8 tbsp (1 stick) unsalted butter, melted and cooled slightly
    2 large eggs
    1 tsp vanilla extract
    ½ cup walnuts, toasted and coarsely chopped (optional) [I used chopped walnuts but didn't bother toasting them]

    Instructions

    1. Adjust oven rack to middle position and set oven to 350 degrees. Spray 8½ by 4½-inch loaf pan with nonstick cooking spray. Whisk flour, salt, and baking soda together in large bowl.

    2. Place 5 bananas in microwave-safe bowl; cover with plastic wrap and cut several steam vents in plastic with paring knife. Microwave on high power until bananas are soft and have released liquid, about 5 minutes. Transfer bananas to fine-mesh strainer placed over medium bowl and allow to drain, stirring occasionally, 15 minutes (you should have ½ to ¾ cup liquid).

    3. Transfer liquid to medium saucepan and cook over medium-high heat until reduced to ¼ cup, about 5 minutes. Remove pan from heat, stir reduced liquid into bananas, and mash with potato masher until fairly smooth. Whisk in eggs, butter, brown sugar, and vanilla.

    4. Pour banana mixture into flour mixture and stir until just combined with some streaks of flour remaining. Gently fold in walnuts (optional) [do NOT exclude the walnuts - they're great for banana nut bread]. Scrape batter into prepared pan.

    5. Slice remaining banana diagonally into ¼-inch-thick slices. Shingle banana slices on top of either side of loaf, leaving 1½-inch-wide space down center to ensure even rise. Sprinkle granulated sugar evenly over loaf. [I skipped this step altogether]

    6. Bake until toothpick inserted in center of loaf comes out clean, 55 to 75 minutes. Cool bread in pan on wire rack 15 minutes, then remove loaf from pan and continue to cool on wire rack. Serve warm or at room temperature.


    Video: America's Test Kitchen Chef Julia Collin Davison shows us how to make the Ultimate Banana Bread

    Joey Chestnut Wins 7th Hot Dog Eating Contest

    Congratulations to San Jose, California's very own Joey "Jaws" Chestnut for winning his 7th straight Coney Island July 4th Hot Dog Eating contest. He broke his old record by literally inhaling 69 hot dogs in ten minutes and successfully defended his highly coveted Mustard Yellow Belt even though former Japanese champion, Takeru Kobayashi, did not particpate in this eating competition. I must admit, however, that although I'm into food, watching the Coney Island Hot Dog Eating contest on ESPN was both quite disgusting and humorous at the same time. It was kind of like I wanted to turn away since watching these people eat several hot dogs by the minute wasn't too pleasant with bits of food flying all over the place along with the sudden body convulsions, but there was a certain part of me where a sense of curiosity willed me to want to watch since I've never seen the whole competition in its 10 minute entirety.

    Joey Chestnut competes in 2013 Coney Island July 4th Hot Dog Eating contest
    Joey Chestnut competes in 2013 Coney Island July 4th Hot Dog Eating contest

    Having said that, I try not to think of the amount of calories that Joey Chestnut consumed in those 10 minutes, but hey it's the 4th of July! What better way to celebrate this country's independence than to eat a classic all-American food item...the hot dog. Not only does Joey Chestnut eat anything from hot dogs to chicken wings, but he does so in record time. Now that's what I call fast food. I think everyone is wondering how Joey Chestnut is able to avoid gaining weight. What's his secret? Perhaps it's just in his genes.

    Birthday of Cup of Noodles Creator

    March 5: today marks the birth date of a very important person who contributed greatly in culinary history with his vision and innovation. About 100 years ago today on March 5, 1910 Momofuku Ando was born in Taiwan. Many former, current, and future college students will pay homage to him as the founder of Nissin Food Products Co. and creator of instant noodles (or cup of noodles).

    March 5: Birthday of Momofuku Ando, inventor of Cup of Noodles
    March 5: Birthday of Momofuku Ando, inventor of Cup of Noodles

    I remember growing up on cup of noodles: the dry noodles prior to adding water, bits of beef, the flavorful broth, and the pieces of corn, carrots, and peas (not to mention the loads of sodium per cup!). I think as a kid, cup of noodles was the only thing I ate that actually had vegetables in it. The novelty of cup of noodles was pouring the boiling hot water into the Styrofoam cup which insulated your hands and kept you from getting burned and eating it straight out of the cup - it can't get any simpler than that! It was always a novelty to see food come to life within seconds by only adding water.

    Sadly, Mr. Ando died a few years ago in 2007 at the age of 96. It is believed that he ate cup of noodles everyday of his life up until his death. Thank you Momofuku for introducing cup of noodles to this world we live in today.

    Guy Fieri's American Kitchen & Bar

    Apparently not only is Guy Fieri's New York City restaurant (Guy's American Kitchen & Bar) not getting good reviews, but someone has now taken the domain name www.guysamericankitchenandbar.com and even posted a fake menu mocking his restaurant. The fake menu includes bogus items such as Guy's Big Balls and Football: The Meal! I know Guy Fieri is a television personality on the Food Network with such successful shows as Guy's Big Bite and Diners, Drive-Ins, and Dives, but wouldn't you think to snatch up that domain name when setting up your restaurant? It should probably be the first thing he should've done. The real link to the restaurant is www.guysamerican.com.

    Guy Fieri's American Kitchen and Bar
    Guy Fieri probably tasting an item from his menu at Guy's American Kitchen & Bar

    Quick Cooking Tip: Boiling Pasta

    When boiling pasta, remember to salt your water. Whether your pasta is spaghetti, lasagna, fettuccine, tortellini, ravioli, linguini, ziti, penne, or capellini, your water should be as salty as chicken stock. Once boiling, drop in about a pound of spaghetti (or other type of pasta) and it should only take about 8 minutes for your pasta to cook. You want to cook your pasta about 90% of the way for a perfect al dente. Drain your pasta and do NOT rinse your pasta. Why? Because there exists a layer of starch on the pasta that will allow your sauce to cling onto your pasta. When you add your sauce to the cooked pasta, these starches also acts as a thickener to thicken the sauce and adds a bit more flavor to your dish. Rinsing your pasta will wash away that vital starch coating and extra flavor.

    boiling your pasta correctly
    The correct way to boil your pasta